MAKHANA KAJU CURRY

MAKHANA KAJU CURRY

Ingredients – Fox nut – 1 Cup , Cashew nut – 1 Cup , Tomato – 3 – 4 , Grated ginger – 1 Teaspoon , Black pepper powder – Half tea spoon , Garam masala – 1 Teaspoon , Green chillies – 1 – 2 , Cumin seeds powder – 1 Teaspoon , Turmeric powder – Half teaspoon , Red chilli powder – 1 Tea spoon , Cream – 1 Tablespoon [ For garnishing ] , Ghee – 1 -2 Tablespoon , Oil – 4 Tablespoon , Coriander leaves – For garnishing , Salt – As per taste .

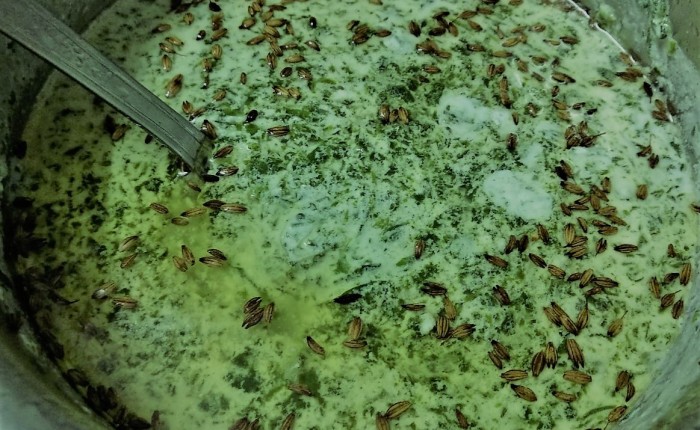
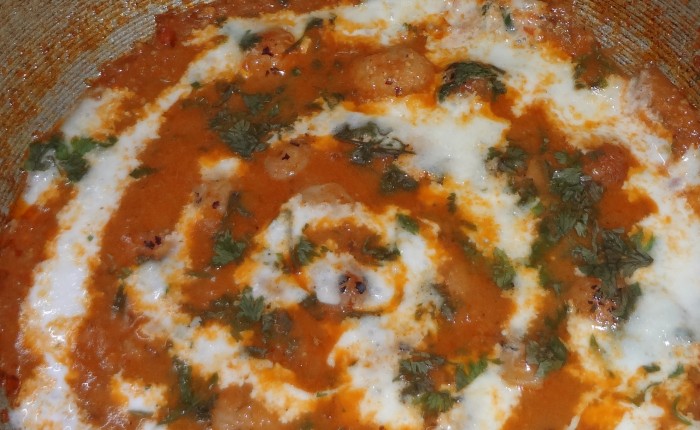
Recipe – Soak half cup of cashew nut in warm water for half hour . Chop tomatoes and green chillies . Put this in to a mixture grinder jar . Add grated ginger , Soaked cashew , turmeric powder , red chilli powder and black pepper powder in to this . Grind it and make a fine paste from this . Heat ghee in a pan . Fry leftover cashew nuts in to this ghee . Place it in to a plate . Now fry fox nut in to this ghee . Remove it from heat after frying . Now heat oil in a pan  . After heating put tomato mixture in to the pan . Fry it on low flame . When oil started leaving the edges of the masala then it is now roast perfectly now put 1 cup water in to this . Put garam masala , cumin seeds powder and salt in to this . Now add fried fox nut and cashew nut in to this . Mix and cover it for 2 – 3 minutes . Switch off the gas . Garnish with cream and fresh coriander . Makhana kaju curry is ready to serve . Serve hot .

Note –

1 . You can adjust consistency of curry according to your choice .

2 . Do not over fry fox nut and cashew nuts .

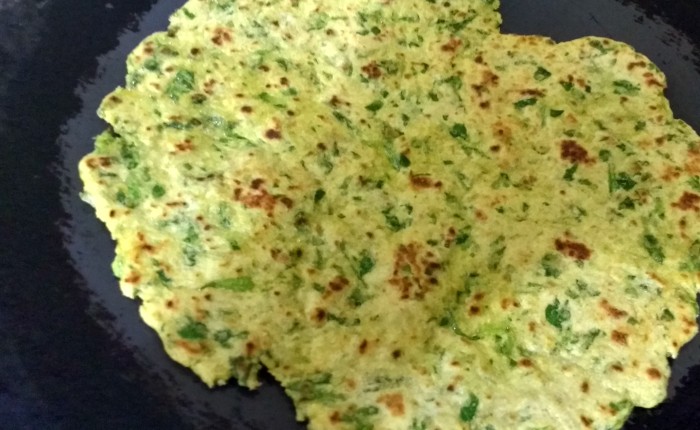
              Have no vegetables to cook today then try this . It takes few minutes to make . Serve it with chapati , phulka or laccha paratha . You can cook it in you lunch or dinner as main course . This is a best option for evening party . Try and share your experience  …..

MISAL PAV

MISAL PAV

Ingredients – Mix bean sprouts – 1 Cup , Pav or bun – As required , Potato – 1 [ Cut in to pieces ] , Chopped onion – 2 [ Medium size ] , Chopped green chilli – 1 – 2 , Garlic – ginger paste – 1 -2 Teaspoon ,  Goda masala or garam masala – 1 Teaspoon , Turmeric powder – Half teaspoon , Red chilli powder – 1 Teaspoon , Coriander powder – 1 Teaspoon , Lemon juice – 2 Teaspoon , Tomato sauce – As per taste , Oil – As required , Farsan or thick sev – As you like , Salt – As per taste , Lemon slices – As required , Fresh coriander leaves – For garnishing .

Recipe – First cook mix bean sprouts in pressure cooker . Deep fry potato pieces . Keep fried potato in a plate . Heat oil in a pan or kadai . After heated put some of chopped onion , chopped green chilli and ginger garlic paste . Fry till onion becomes golden brown . Add coriander powder and fry little , then add turmeric powder , red chilli powder , and tomato sauce . fry for 1-2 minutes . Now add boiled mix bean sprouts in to this . Add salt and lemon juice in to this . Mix well and cover it for 3-4 minutes . Switch off the flame . Misal is ready . Let us see how to serve this .

Serving style – First put this misal in to a serving bowl . Put  fried potato slices , chopped onion , some farsan or sev and Fresh coriander leaves on this . Serve lemon slices with this . Fry pav or bun on a griddle or tawa with butter or ghee . Serve this fried pav with misal . Misal pav is now  ready to serve . Always serve this hot .

Note –

1 . Use fresh bun or pav for this .

2 . If you find deep fried potato is more oily for you , then you can use pieces of boiled potato instead of frying potato .

3 . Consistency of misal is generally thick , but you can adjust it according to your choice .

4 . If you want more tomato sauce you can add this while serving .

  Generally misal pav is made from whole mooth [ matki ] sprouts , but i used mix bean sprouts as it is much healthier and tasty too . Some people avoid pav or bun due to some health issues , then you can eat this misal with chapati too . It can be your next party menu . You can serve this in any time meal as breakfast , lunch or dinner . It can be serve as one dish meal too . Please try this recipe and i hope you liked it . Share your experience , thoughts , and query with me …..

GREEN PEAS PARATHA

Ingredients – Green peas – 1 Cup , Wheat flour – 2 Cup , Cumin powder –  1 Teaspoon , Turmeric powder – Half teaspoon , Green chilli paste – 1 Teaspoon , Finally chopped coriander leaves – 2 Teaspoon , Dried mango powder – 1 Teaspoon , Garam masala –  1 Teaspoon [ Optional ] , Salt – As per taste , Oil – As required .

Recipe – First Heat 2 tablespoon oil in a pan . After heated add green chilli paste and fry it for few seconds . After that add cumin powder , turmeric powder , green peas and salt . Mix it well . Put some water in to the pan to cook green peas . When green peas cooked completely , then add dried mango powder , garam masala , and chopped coriander leaves . There should not be any water remain in the pan . Press green peas with potato masher so that we find a thick filling for parathas . Put this filling in to a plate and let it be cool .

Now take wheat flour in to a big bowl . Add salt in to this . Mix well and knead it with water till you get a soft dough . Take a small ball from the dough . Flatten it and dust it with dry wheat flour . With a rolling pin , roll them in to about 4 inches diameter round . Place peas stuffing in the center of this dough . Take the edge and start pleating as well as bringing the plates in center . Press it . Dust some flour on this and roll it in to a round about 7-8 inches in diameter . Place this on a hot tawa or griddle . When the base is partly cooked flip the paratha and spread some oil on this . Flip again and cook it from other side . Spread oil as needed . Cook it properly from both sides . You should see golden or brown spots on both sides of paratha . Make all peas paratha this way . Peas paratha is ready to serve . Serve hot with green chutney or tomato sauce .

Note –

1 . No water should left in peas filling .

2 . Adding oil or ghee while kneading dough makes the paratha soft .

3 . You can press the paratha edges with a spatula while cooking , so that they are fried well . Some time edges are not cooked well .

      In winter , green peas are easily available in indian vegetable market but in summer i use frozen peas for parathas . So you can also use frozen peas in summer  , but the fresh peas is more tasty than frozen . As we want to ignore oily food in summer so this paratha is generally made in winter . It can be served as breakfast or one meal dish in lunch or dinner too . The taste of this paratha is very delicious ,and kids are loved to eat this . So please try and share your experience with me ….


BUTTER KHICHDI

Ingredients – Moong dal – 1 Cup , Rice – Half cup , Butter – 2 Tablespoon , Cumin seeds – 1 Teaspoon , Turmeric powder – Half teaspoon , Red chilli powder – 1 Teaspoon , Black pepper powder – As per taste [ optional ] , Water – 4 to 4.5 cup , Fresh coriander leaves [ clean and washed ] , Salt – As per taste .

Recipe – First clean and wash moong dal and rice together . Heat a pressure cooker or handi . Put butter in to this . After heated add cumin seeds . When cumin seeds splutters then add washed moong dal and rice . Mix it well and fry for 2 minutes .

                          Now add turmeric powder , red chilli powder and black pepper powder in to this . Mix it and add water and salt . When water comes to boil close the lid tightly and cook the khichdi on a low flame for 3 whistles . Switch off the gas and let it be cool . After that open the lid and check it . If khichdi becomes too thick then you can add water in to this and stir well . Butter khichdi is ready  to serve . Garnish it with fresh coriander leaves while serving .

Note –

1 . Generally consistency of butter khichdi is little thick but you can adjust consistency of this as per your choice .

2 . If you are cooking khichdi in a handi or pan then it takes more water . 

Butter khichdi is my favourite dish when i want to eat some light food . Even doctors recommend khichdi to patients cause it is healthy too . I like to add some black pepper powder in to this for a spicy taste but if you do not like then avoid it . You can serve it in breakfast , lunch or dinner . It can also be served as a one dish meal . Khichdi have different variations like vegetable khichdi or tuar dal khichdi , but this one is very easy and delicious recipe for all of you . I suggest you to to serve this with fresh buttermilk .

                        You can search’ BUTTERMILK ‘  recipe in beverage category in my blog . Please try this and share your experience with me ………..


COCONUT CHUTNEY

Ingredients – Fresh grated coconut – 1 Cup , Green chillies – 2 [ chopped ] , Lemon juice – 1 Teaspoon , Oil – 2 Teaspoon , Mustard seeds – Half teaspoon , Curry leaves – 4 – 5 [ washed and dry ] , Salt – As per taste .

Recipe – Place grated coconut , chopped green chillies , lemon juice , salt and water as required in to a mixer grinder jar . Grind it and make a fine paste . The consistency of this chutney should not be more thin or more thick . Put this chutney in to a bowl . Heat oil in a frying pan . After heated add mustard seeds and curry leaves . Switch off the gas and put this tempering on chutney . Mix it when serving . Coconut chutney is ready to serve . 

Note –

1 . Do not use dry coconut for this chutney .

2 . You can use coconut water while grinding this chutney .

3 . You can use sesame or peanut oil for tempering .

4 . Coconut chutney has to be consumed fresh . 

Make this coconut chutney with south indian recipes like idli , dosa ,uttapam or appe …There are many recipes for coconut chutney but this is my recipe ; As it is easy recipe and it’s ingredients are easily available in our home . Try this and share your thoughts  , views and suggestions with me …..

IDLI [ FROM HOMEMADE BATTER ]

IDLI [ FROM HOMEMADE BATTER ]

Ingredients –

Idli batter – As required , Oil – For greasing , Water – as required .

Recipe – Put 3 cups of water in a steamer or pressure cooker and allow it to boil . If you use pressure cooker for idli then remove the vent weight / whistle first . Grease the all idli mould with oil . Now pour a spoon from the batter in greased idli moulds . Keep the idli mould in steamer or pressure cooker . Steam for 20 minutes . 

                After 20 minutes , switch off the gas . Insert a toothpick in to idli for check  , it is cooked or not properly . If toothpick does not come out clean , then keep it for steaming again for a few more minutes . When done remove the idli mould from cooker or steamer . Allow it to cool for five minutes . After that remove idli carefully from the mould with the help of butter knife or regular knife . As like this remove all idlis and place it in a casserole . Idli is ready to eat . Serve it with hot or warm sambar and chutney .

Note –

1 . If you see consistency of batter is too thick , then add some warm water in to this .

2 . Gently and lightly swirl the batter , don’t over do this .

                         Basically it is a south indian dish but liked by all . It is a very easy recipe and as it is a less oil recipe so it’s a healthy recipe too . I suggest you to make coconut chutney , tomato chutney and sambhar with idli . You can cook it in summer or winter and served it as a breakfast , lunch or dinner . It can be serve as a one dish meal too . See my previous post for idli dosa batter at home . Please try this recipe and share your experience , suggestions , and thoughts with us ……..

METHI KE PARATHE

METHI KE PARATHE

Ingredients –

Fenugreek leaves – 2 Cup , Wheat flour – 2 Cup , Turmeric powder – Half teaspoon , Red chilli powder – 1 Teaspoon , Garlic paste – 1 Teaspoon , Oil – As required , Salt – As your taste .

Recipe – First clean and wash fenugreek leaves . Drain them completely . Chop fenugreek leaves finely and keep aside . Now take a bowl . Add wheat flour , Salt , garlic paste , turmeric powder and red chilli powder in to this . Pour some water and knead it to a smooth dough . Make medium sized balls of the dough . Dust the dough ball with some dry wheat flour and start rolling the methi paratha . Roll it in to medium sized chapatis . Place the methi paratha on a hot tawa . When one side is bit cooked , then flip the paratha . Spread oil on this side . Flip again and you see some golden or brown spots on this . Apply oil on this side too . Flip again and again , till the methi paratha is evenly cooked from both sides and become crispy . Put this paratha in to a plate . Methi paratha is ready to eat . Serve this hot with green coriander chutney .

Note – 

1 . If you do not eat garlic , then avoid it .

2 . Always use fresh fenugreek leaves .

            Fengureek leaves have health benefits , specially in winter . You can serve this as one  dish meal in dinner or lunch . It can be served as a breakfast . Some people do not add garlic paste in dough , but add garlic in chutney . You can also do the same . Reason is that some people do not eat garlic in their food , so you can serve them paratha with pickle or fresh curd .

Try this recipe and enjoy your winter . I would like to tell all the viewers who like my recipes ; please share your views , suggestions and query in comment box .

Tell me what do you thing about my posts ……….

KHAMAN KAKDI [ CUCUMBER PEANUT SALAD ]

Ingredients –

Cucumber – 2 , Powder of roasted peanut – 2 Teaspoon , Ghee – 1 Tablespoon , Cumin seeds – Half teaspoon , Sugar – 1 Teaspoon , Salt – As per taste , Fresh coriander leaves [ For garnishing ] .

Recipe –

Wash and peel the cucumber . Now grate it . Put this in to a bowl . Add powder of roasted peanut in to this . Add sugar and salt . Mix well . Heat ghee in a frying pan . After heated add cumin seeds in to this . Cumin seeds will started to crackle . Switch off the flame and put this tempering on cucumber mixture . Mix it  and garnish with fresh coriander . Khaman kakdi is ready to serve .

Note –

1 . First taste the cucumber , If it is bitter in taste then do not use this .

2 . If you do not like sugar in khaman kakdi  , then avoid it .

                     This is a maharashtrian salad [ koshimbir ] dish . If you have roasted peanut powder in your home then it takes just few minutes to ready . You can serve this as a side dish in lunch or dinner as it’s a easy and healthy recipe too . Please try it and i am waiting for your response …..


SOOJI KI KHEER

Ingredients –

Sooji [ Semolina ] – 1\4  cup , Milk – 2 .5 – 3 cup , Sugar – 4 Tablespoon , Ghee – 3 – 4 Tablespoon , Cashew – 6 – 7 [ Broke in to pieces ] , Almonds – 4 – 6 [ Broken in to small pieces ] .

Recipe – 

Heat ghee in a heavy bottom pan . Add cashew  and almond pieces in to this . Saute for about a minute on a low flame . Put this nuts in to a plate . After that add semolina or sooji  in this pan and fry till the sooji becomes fragrant . Stir continuosly otherwise it burns . Fry for 3 – 4 minutes on low flame . Now add milk and stir it . You can see it started to become thick . Add sugar . Stir well and bring the kheer to a gentle simmer . You can thicken the kheer more if you want . Now add fried cashew nuts and almonds pieces . Mix well and switch off the gas . Sooji kheer is ready to serve . You can serve it hot , warm or refrigerate .

Note –

1 . Always make this kheer in a heavy bottom pan .

2 . Sugar quantity can be adjust as your choice . You can adjust consistency of  kheer according to your choice .

3 . If you like saffron flavour , then  you can add saffron  [ soaked in milk  for some time ] in to this kheer . 

                   Generally this kheer is made for kids who just started to eat , but elders are also love to eat this . As  it takes few minutes to cook , You can make it when you have less time to make sweet dish . You can serve this to your kids in breakfast or as a sweet dish in lunch or dinner .

                  I suggest you to try this  ; hope you will like it . Please share your experience , views and suggestions …..

BATHUE KA RAITA

BATHUE KA RAITA

Ingredients –

Fresh green bathua – 500 g.m. , Fresh curd – 400 g.m. , Cumin seeds – 1 Teaspoon , Ghee – 2 Tablespoon , Salt – As per taste .

Recipe –

First clean and wash bathua leaves . After that chopped it . Add salt  in curd as per your taste . Mix well . Now heat a pan and boil bathua leaves with water in to this . Boil it for 2-4 minutes . Drain all water from this . Cool boiled bathua leaves for sometime and then put this in to salted curd . Mix well . Heat ghee in a frying pan . After heated add cumin seeds and let it crackle . Switch off the gas . Put this tempting on curd . Delicious bathua raita is ready to serve . Mix well while serving .

Note –

1 . Use fresh and green bathua for this .

2 . Do not over boil bathua .

Bathua is easily available in any indian vegetable market in winter days . The taste of bathua raita is very delicious and it’s a very easy recipe . Bathua is very rich in various nutrients like iron , potassium , phosphorus , calcium , and vitamin c . So this recipe is healthy too . All the people who like all types of raita will definitely love this recipe .

                                Try this and share your experience . If you want to share your thoughts ,suggestions , or any query , write me …..